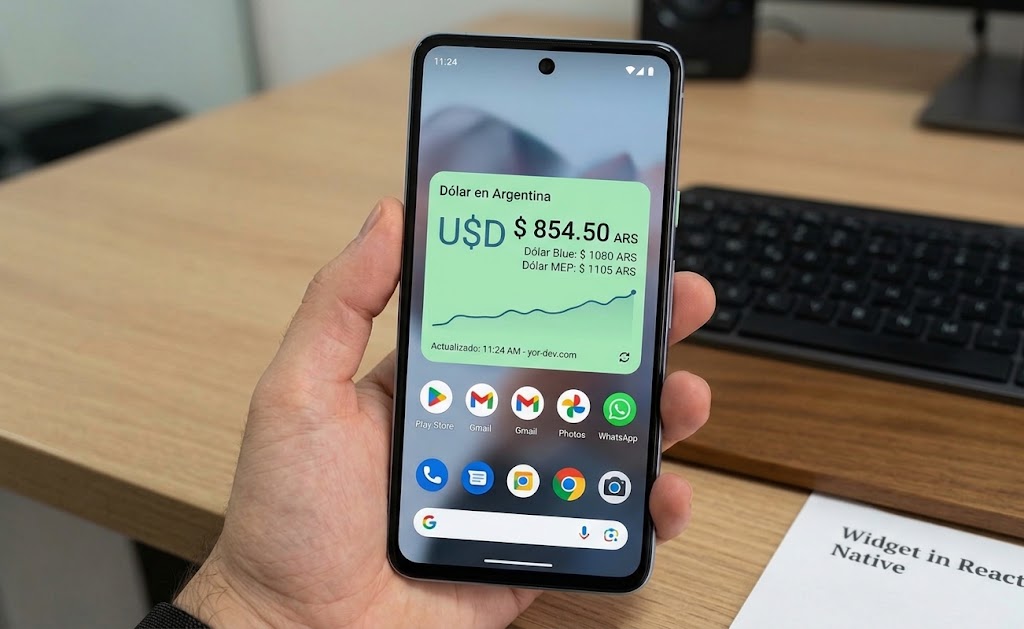
In this tutorial, we’ll build a React Native (Expo) app that displays real-time Argentine peso to dollar exchange rates, plus a native home screen widget on both Android and iOS.
The app will feature:
- Real-time exchange rate display from the DolarAPI
- Native widgets showing the current rate (Kotlin on Android, Swift + WidgetKit on iOS)
- Widget interaction with a click counter
- Bi-directional communication between the widget and the React Native app
The tutorial is split into three parts:
Part 3: The iOS widget (Swift + WidgetKit)r the UI layer with native Kotlin code for widget functionality, demonstrating powerful cross-platform mobile development patterns.
Part 1: The React Native app, shared by both platforms
Part 2: The Android widget (Kotlin)
Demo Video
Watch the widget in action:
Android
iOs
In this demo, you’ll see:
- The React Native app displaying live exchange rates
- The Android home screen widget showing the dollar value
- Clicking the widget button to increment the check counter
- The counter updating both in the widget and the app
Prerequisites & Initial Setup
Before starting, ensure you have:
- Node.js installed
- Expo CLI set up
- Android: an Android development environment (Android Studio + emulator or device)
- iOS: a Mac with Xcode 16 or newer, and an iOS 17+ simulator or device
- Basic knowledge of React Native, Kotlin and Swift
Create the Project
Start by creating a new Expo project:
npx create-expo-app@latest my-widget-app --template blank
Navigate to your project directory and run it:
cd my-widget-app
npm run android
Note: If you don’t see your android or ios folder, run:
npx expo prebuildWarning: android/ and ios/ are generated folders, and they’re listed in .gitignore. Running npx expo prebuild again can delete the custom widget files we add in this tutorial. Commit your work before running it, and force-add the native files to git (for example git add -f android/app/src/main/…).
Part 1: The React Native App
Step 1: Setting Up Services & Utilities
API Service Layer
Create services/apiCall.ts to handle API requests:
export default async function apiGetCall(url: string){
    try{
        const response = await fetch(url)
        const json = await response.json();
        return json;
    }
    catch(error){
        console.error('Error fetching API:', error);
        throw error;
    }
}
Currency Formatting Utility
Create utils/utils.ts for currency formatting:
export function setMoneyFormat(value: number): string {
    return value.toLocaleString('es-AR', {
        style: 'currency',
        currency: 'ARS'
    });
}
Step 2: Building the Main Screen
Update your App.tsx to display dollar exchange rates. The app talks to the widget through a native module called DolarCheckWidget, which we create in Part 2 (Android) and Part 3 (iOS). Both platforms use the same module name and methods, so this JavaScript code works on both:
getCheckCount(): reads how many times the widget’s button was tapped
dataToShow(price): sends the price to the widget
import { StatusBar } from 'expo-status-bar';
import { StyleSheet, Text, View, NativeModules, Pressable, ScrollView } from 'react-native';
import { SafeAreaView } from 'react-native-safe-area-context';
import { useEffect, useState } from 'react';
import apiGetCall from './services/apiCall';
import { setMoneyFormat } from './utils/utils';

const { CustomNativeDollarView } = NativeModules;

export default function App() {

  const [dolars, setDolars] = useState([]);
  const [countClicks, setCounterClicks] = useState(0);

  // TODO: Update exchange rates every 5 minutes
  const fetchDolarQuote = async () => {
    try{
        const data = await apiGetCall("https://dolarapi.com/v1/dolares")
        console.log("Data fetched:", data);
        setDolars(data);
    }catch(error){
      console.error("Error fetching data:", error);
    }
  }

  // Retrieve check count from widget (widget-to-app communication)
  const getCheckCountLocal = async () => {
    const thisCount = await DolarCheckWidget.getCheckCount();
    setCounterClicks(thisCount);
  };

  const sendPriceToWidget = async (price) => {
    try {
      CustomNativeDollarView?.dataToShow( `${price}` );
    } catch (error) {
      console.error("Error sending price to widget:", error);
    }
  }

  useEffect(() => {
    fetchDolarQuote();
    getCheckCountLocal();
  }, []);

  // Send data to native widget
  useEffect(() => {
    if (dolars.length > 0) {
        const price = dolars[0].compra;
        sendPriceToWidget(price);
    }
  }, [dolars]);

  return (
    <SafeAreaView style={{ flex: 1 }}>
      <View style={styles.container}>
      <Text style={[styles.cardTitle, {textAlign: 'center'}]}>counter: {countClicks}</Text>
      <Pressable onPress={() => {
        getCheckCountLocal();
      }}>
        <Text style={[styles.cardTitle, {textAlign: 'center', color: 'blue'}]}>Get counter from Widget</Text>
      </Pressable>

      <Pressable onPress={() => {
        sendPriceToWidget(dolars[0].compra);
      }}>
        <Text style={[styles.cardTitle, {textAlign: 'center', color: 'blue'}]}>Send to widget</Text>
      </Pressable>

      <ScrollView style={{marginTop: 10}}>
      {dolars.map((dolar, index) => (
        <View style={styles.row} key={index}>
          <View style={styles.card}>
          <Text style={styles.cardTitle}>{dolar.nombre}</Text>
          <View style={styles.cardContent}>
            <View style={styles.dataItem}>
              <Text style={styles.label}>I'm selling at</Text>
              <Text style={[styles.value, styles.incoming]}>
                {setMoneyFormat(dolar.compra)}
              </Text>
            </View>
            <View style={styles.divider} />
            <View style={styles.dataItem}>
              <Text style={styles.label}>They're selling at</Text>
              <Text style={[styles.value, styles.outgoing]}>
                {setMoneyFormat(dolar.venta)}
              </Text>
            </View>
            <View style={styles.divider} />
            <View style={styles.dataItem}>
              <Text style={styles.label}>Average</Text>
              <Text style={[styles.value, styles.media]}>
                {setMoneyFormat((dolar.venta + dolar.compra)/2)}
              </Text>
            </View>
          </View>
          </View>
          </View>
      ))}
      </ScrollView>
      <StatusBar style="auto" />
    </View>
    </SafeAreaView>
  );
}

const styles = StyleSheet.create({
  container: {
    flex: 1,
    backgroundColor: '#f8fafc',
    paddingHorizontal: 12,
    justifyContent: 'center',
  },
  loadingContainer: {
    flex: 1,
    justifyContent: 'center',
    alignItems: 'center',
    backgroundColor: '#f8fafc',
  },
  row: {
    flexDirection: 'row',
    justifyContent: 'space-between',
    marginBottom: 12,
    gap: 12,
  },
  card: {
    flex: 1,
    backgroundColor: '#fff',
    borderRadius: 12,
    padding: 14,
    borderWidth: 1,
    borderColor: '#e2e8f0',
    shadowColor: '#000',
    shadowOffset: { width: 0, height: 1 },
    shadowOpacity: 0.05,
    shadowRadius: 2,
    elevation: 1,
  },
  cardTitle: {
    fontSize: 13,
    fontWeight: '600',
    color: '#475569',
    marginBottom: 10,
    textTransform: 'uppercase',
    letterSpacing: 0.5,
  },
  cardContent: {
    flexDirection: 'row',
    alignItems: 'center',
    justifyContent: 'space-between',
  },
  dataItem: {
    flex: 1,
    alignItems: 'center',
  },
  divider: {
    width: 1,
    height: 35,
    backgroundColor: '#e2e8f0',
    marginHorizontal: 8,
  },
  label: {
    fontSize: 11,
    color: '#94a3b8',
    marginBottom: 4,
    fontWeight: '500',
    textTransform: 'uppercase',
    letterSpacing: 0.3,
  },
  value: {
    fontSize: 15,
    fontWeight: '700',
  },
  incoming: {
    color: '#10b981',
  },
  outgoing: {
    color: '#ef4444',
  },
  media: {
    color: 'orange',
  },
});
Part 2: Android Widget (Kotlin)
Step 1: Creating the Widget Layout
Widget XML Layout
Create the widget UI in android/app/src/main/res/layout/dollar_view.xml:
<?xml version="1.0" encoding="utf-8"?>
<RelativeLayout xmlns:android="http://schemas.android.com/apk/res/android"
    android:layout_width="match_parent"
    android:layout_height="wrap_content"
    android:padding="16dp"
    android:background="@color/colorGreenLight"
    android:gravity="center">

    <TextView
        android:id="@+id/loading"
        android:layout_width="wrap_content"
        android:layout_height="wrap_content"
        android:text="Loading..."
        android:textSize="16sp"
        android:textColor="#000" />

    <TextView
        android:id="@+id/dolarValue"
        android:layout_below="@id/loading"
        android:layout_width="wrap_content"
        android:layout_height="wrap_content"
        android:layout_marginTop="8dp"
        android:text="Dolar today"
        android:textColor="#000000"
        android:textSize="14sp" />

    <TextView
        android:id="@+id/counterTimes"
        android:layout_below="@id/dolarValue"
        android:layout_width="wrap_content"
        android:layout_height="wrap_content"
        android:layout_marginTop="8dp"
        android:text="Checked: 0"
        android:textColor="#000000"
        android:textSize="14sp" />

    <Button
        android:id="@+id/btnAction"
        android:layout_below="@id/counterTimes"
        android:layout_width="wrap_content"
        android:layout_height="wrap_content"
        android:text="@string/click_button"
        android:layout_marginTop="16dp"/>
</RelativeLayout>
Step 2: Implementing the Widget Provider
DolarCheckWidget Class
Create the widget provider in android/app/src/main/java/com/anonymous/mywidgetapp/DolarCheckWidget.kt:
package com.anonymous.mywidgetapp

import android.app.PendingIntent
import android.appwidget.AppWidgetManager
import android.appwidget.AppWidgetProvider
import android.content.ComponentName
import android.content.Context
import android.content.Intent
import android.util.Log
import android.widget.RemoteViews

class DolarCheckWidget : AppWidgetProvider() {

    companion object {
        private const val ACTION_INCREMENT =
            "com.yourapp.ACTION_INCREMENT"
        private const val PREFS_NAME = "DolarWidgetPrefs"
        private const val KEY_COUNT = "checkCount"
        private const val KEY_DOLAR = "dolarValue"
    }

    override fun onUpdate(
        context: Context,
        appWidgetManager: AppWidgetManager,
        appWidgetIds: IntArray
    ) {
        Log.i("RnDolar", "Widget update triggered")
        val prefs = context?.getSharedPreferences(
            KEY_DOLAR,
            Context.MODE_PRIVATE
        )

        val dolarValue = prefs?.getString(KEY_DOLAR, "0")
        Log.i("RnDolar", "Dolar Value in widget: $dolarValue")

        appWidgetIds.forEach { widgetId ->
            val loadingViews = RemoteViews(context.packageName, R.layout.dollar_view)
            loadingViews.setTextViewText(R.id.loading, " ")
            loadingViews.setTextViewText(R.id.dolarValue, dolarValue)
            appWidgetManager.updateAppWidget(widgetId, loadingViews)
            updateWidget(context, appWidgetManager, widgetId)
        }
    }

    override fun onReceive(
        context: Context,
        intent: Intent
    ) {
        super.onReceive(context, intent)
        if (intent.action == ACTION_INCREMENT) {
            incrementCounter(context)
            updateAllWidgets(context)
        }
    }

    private fun incrementCounter(context: Context) {
        val prefs = context.getSharedPreferences(
            PREFS_NAME,
            Context.MODE_PRIVATE
        )
        val currentCount = prefs.getInt(KEY_COUNT, 0)
        prefs.edit()
            .putInt(KEY_COUNT, currentCount + 1)
            .apply()
    }

    private fun updateWidget(
        context: Context,
        appWidgetManager: AppWidgetManager,
        widgetId: Int
    ) {
        val prefs = context.getSharedPreferences(
            PREFS_NAME,
            Context.MODE_PRIVATE
        )
        val count = prefs.getInt(KEY_COUNT, 0)
        val views = RemoteViews(
            context.packageName,
            R.layout.dollar_view
        )

        views.setTextViewText(
            R.id.counterTimes,
            "Checked: $count times"
        )

        val incrementIntent = Intent(
            context,
            DolarCheckWidget::class.java
        ).apply {
            action = ACTION_INCREMENT
        }

        val pendingIntent = PendingIntent.getBroadcast(
            context,
            widgetId,
            incrementIntent,
            PendingIntent.FLAG_UPDATE_CURRENT or
                PendingIntent.FLAG_IMMUTABLE
        )

        views.setOnClickPendingIntent(
            R.id.btnAction,
            pendingIntent
        )

        appWidgetManager.updateAppWidget(widgetId, views)
    }

    private fun updateAllWidgets(context: Context) {
        val appWidgetManager =
            AppWidgetManager.getInstance(context)
        val widgetComponent = ComponentName(
            context,
            DolarCheckWidget::class.java
        )
        val widgetIds = appWidgetManager.getAppWidgetIds(
            widgetComponent
        )
        widgetIds.forEach { widgetId ->
            updateWidget(context, appWidgetManager, widgetId)
        }
    }
}
Step 3: Widget Configuration
Widget Configuration File
Create android/app/src/main/res/xml/dolar_widget_info.xml:
<?xml version="1.0" encoding="utf-8"?>
<appwidget-provider
    xmlns:android="http://schemas.android.com/apk/res/android"
    android:initialLayout="@layout/dollar_view"
    android:minWidth="120dp"
    android:minHeight="120dp"
    android:updatePeriodMillis="86400000"
    android:resizeMode="horizontal|vertical"
    android:widgetCategory="home_screen"
    android:description="@string/widget_description" />
Update AndroidManifest.xml
Add the widget receiver declaration inside the <application> tag in AndroidManifest.xml:
<!-- Widget receiver declaration -->
<receiver
    android:name=".DolarCheckWidget"
    android:exported="true">
    <intent-filter>
        <action android:name="android.appwidget.action.APPWIDGET_UPDATE" />
    </intent-filter>
    <meta-data
        android:name="android.appwidget.provider"
        android:resource="@xml/dolar_widget_info" />
</receiver>
Step 4: Creating the React Native Module
DolarCheckWidgetModule
Create the bridge module in android/app/src/main/java/com/anonymous/mywidgetapp/DolarCheckWidgetModule.kt:
package com.anonymous.mywidgetapp

import android.appwidget.AppWidgetManager
import android.content.ComponentName
import android.content.Context
import android.content.SharedPreferences
import com.facebook.react.bridge.ReactApplicationContext
import com.facebook.react.bridge.ReactContextBaseJavaModule
import com.facebook.react.bridge.ReactMethod
import com.facebook.react.bridge.Promise

class DolarCheckWidgetModule(private val context: ReactApplicationContext)
    : ReactContextBaseJavaModule(context) {

    companion object {
        private const val PREFS_NAME = "DolarWidgetPrefs"
        private const val KEY_DOLAR = "dolarValue"
        private const val KEY_COUNT = "checkCount"
    }

    override fun getName(): String = "DolarCheckWidget"

    @ReactMethod
    fun dataToShow(dolarInfo: String) {
        val prefs: SharedPreferences =
            context.getSharedPreferences(PREFS_NAME, Context.MODE_PRIVATE)
        prefs.edit().putString(KEY_DOLAR, dolarInfo).apply()

        val widgetManager = AppWidgetManager.getInstance(context)
        val widget = ComponentName(context, DolarCheckWidget::class.java)
        widgetManager.notifyAppWidgetViewDataChanged(
            widgetManager.getAppWidgetIds(widget),
            R.id.dolarValue
        )
    }

    @ReactMethod
    fun getCheckCount(promise: Promise) {
        try {
            val prefs = reactApplicationContext.getSharedPreferences(
                PREFS_NAME,
                Context.MODE_PRIVATE
            )
            val count = prefs.getInt(KEY_COUNT, 0)
            promise.resolve(count)
        } catch (error: Exception) {
            promise.reject(
                "GET_CHECK_COUNT_ERROR",
                "Unable to retrieve the check count from widget",
                error
            )
        }
    }
}
Step 5: Registering the Module
DolarCheckWidgetPackage
Create the package file in android/app/src/main/java/com/anonymous/mywidgetapp/DolarCheckWidgetPackage.kt:
package com.anonymous.mywidgetapp

import com.facebook.react.ReactPackage
import com.facebook.react.bridge.NativeModule
import com.facebook.react.bridge.ReactApplicationContext
import com.facebook.react.uimanager.ViewManager

class DolarCheckWidgetPackage : ReactPackage {

    override fun createNativeModules(reactContext: ReactApplicationContext):
            List<NativeModule> {
        return listOf(DolarCheckWidgetModule(reactContext))
    }

    override fun createViewManagers(reactContext: ReactApplicationContext):
            List<ViewManager<*, *>> {
        return emptyList()
    }
}
Update MainApplication.kt
Add the package to your MainApplication.kt:
// In the packages list within MainApplication.kt
add(DolarCheckWidgetPackage())
Part 3: iOS Widget (Swift + WidgetKit)
How iOS Widgets Work
On iOS, a widget is a separate small app (a Widget Extension) that lives inside your main app. It runs in its own process and can’t talk to your app directly, so the two share data through an App Group: a storage area that both of them can read and write. The App Group is the iOS equivalent of SharedPreferences.
React Native (App.tsx)
   │  NativeModules.DolarCheckWidget.dataToShow(price)
   ▼
Native module (Swift)  ──writes──►  App Group storage  ◄──reads/writes──  Widget Extension (SwiftUI)
   ▲                                (dolarValue, checkCount)                    │ "+" button
   └── getCheckCount() ──reads──────────────┘                                    ▼
                                                                         IncrementCountIntent
Each Android piece has an iOS equivalent:
| Android | iOS |
|---|---|
DolarCheckWidget.kt (AppWidgetProvider) | Widget Extension target (DolarWidget.swift) |
dollar_view.xml (RemoteViews layout) | SwiftUI view (DolarWidgetView) |
dolar_widget_info.xml (sizes, update period) | Widget configuration (supportedFamilies) + timeline |
SharedPreferences | App Group + shared UserDefaults (WidgetStorage.swift) |
PendingIntent + onReceive on the button | Interactive Button + AppIntent (iOS 17+) |
DolarCheckWidgetModule.kt | DolarCheckWidget.swift |
DolarCheckWidgetPackage.kt + MainApplication.kt | DolarCheckWidget.m (RCT_EXTERN_MODULE) |
<receiver> in AndroidManifest.xml | The extension target embedded in the app |
How to create each file in Xcode: right-click the folder, choose New File from Template… → Swift File (or Objective-C File) and enter the name. In the save dialog, tick the Targets listed for that file. You can change this later in the right panel under File Inspector → Target Membership.
Step 1: Create the App Group
- Open
ios/mywidgetapp.xcworkspacein Xcode (the.xcworkspace, not the.xcodeproj, so the Pods get loaded). - In the left sidebar, click the mywidgetapp project and select the mywidgetapp target.
- Open the Signing & Capabilities tab and choose your Team.
- Click + Capability → App Groups, click + and enter
group.com.anonymous.mywidgetapp.
This updates ios/mywidgetapp/mywidgetapp.entitlements with the new App Group.
Step 2: Create the Widget Extension Target
- Choose File → New → Target…, open the iOS tab, choose Widget Extension and click Next.
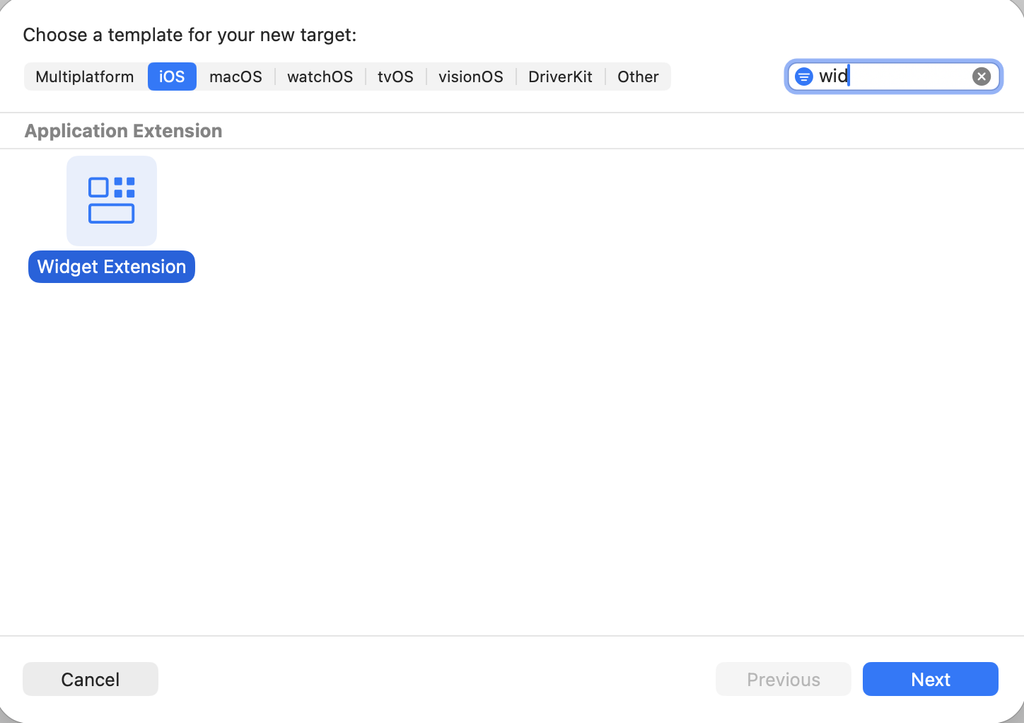
- 2. Set Product Name to
DolarWidgetand pick the same Team. Uncheck “Include Live Activity”, “Include Control” and “Include Configuration App Intent”, then click Finish.
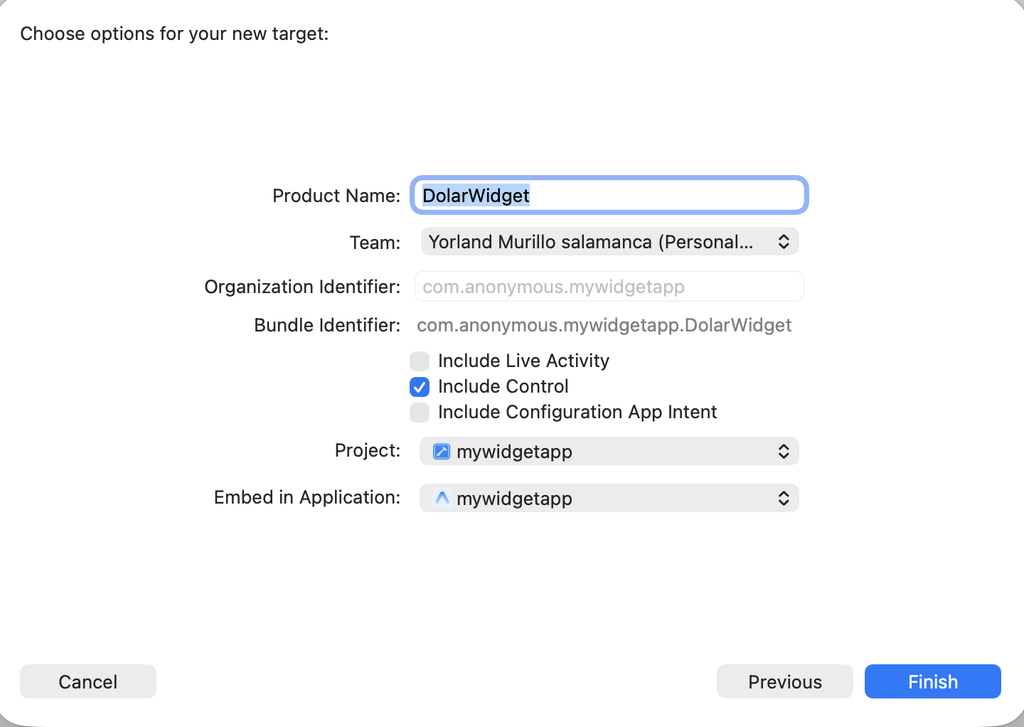
In this screenshot “Include Control” is still checked. If you leave it checked, Xcode also creates DolarWidgetControl.swift, which we don’t use.
3. When Xcode asks “Activate scheme?”, click Activate. (To run the app later, switch the scheme back to mywidgetapp.)
4. Under TARGETS, select DolarWidgetExtension:
- In the General tab, set Minimum Deployments to iOS 17.0. The interactive “+” button needs it.
- In Signing & Capabilities, click + Capability → App Groups and tick the same
group.com.anonymous.mywidgetapp.
Important: the app and the widget must have the same App Group. If the widget doesn't have it, iOS gives the widget its own private storage. The app and the widget then never see each other's data, and there's no error message to warn you.Xcode creates a DolarWidget/ folder with DolarWidget.swift, DolarWidgetBundle.swift, Assets.xcassets and Info.plist.
Step 3: Shared Storage (WidgetStorage.swift)
This is our “SharedPreferences”: a small helper that both the app and the widget use to read and write the same values.
- Folder:
mywidgetapp - Targets: ✅ mywidgetapp ✅ DolarWidgetExtension (both, because the app and the widget both use it)
- If Xcode asks to create a bridging header, click Don’t Create. Expo already created one.
import Foundation

// Shared storage between the app and the widget (like SharedPreferences on Android).
// Both targets must have the same App Group enabled.
enum WidgetStorage {
  static let appGroup = "group.com.anonymous.mywidgetapp"
  static let keyDolar = "dolarValue"
  static let keyCount = "checkCount"

  static var defaults: UserDefaults? { UserDefaults(suiteName: appGroup) }

  static var dolarValue: String? {
    get { defaults?.string(forKey: keyDolar) }
    set { defaults?.set(newValue, forKey: keyDolar) }
  }

  static var checkCount: Int {
    get { defaults?.integer(forKey: keyCount) ?? 0 }
    set { defaults?.set(newValue, forKey: keyCount) }
  }
}Step 4: The Widget (DolarWidget/DolarWidget.swift)
Xcode already created this file from its template. Replace all of its content with the code below. It has four pieces:
DolarEntry: the data for one render of the widget (price and count).DolarProvider: reads the shared storage and tells iOS what to show and when (likeonUpdate()on Android).DolarWidgetView: the SwiftUI layout (likedollar_view.xml).DolarWidget: name, description and sizes (likedolar_widget_info.xml).
import WidgetKit
import SwiftUI
import AppIntents

// One "render" of the widget: the data it shows at a given time.
struct DolarEntry: TimelineEntry {
  let date: Date
  let dolarValue: String?
  let count: Int
}

// Like onUpdate() on Android: tells iOS what to show and when.
struct DolarProvider: TimelineProvider {
  func placeholder(in context: Context) -> DolarEntry {
    DolarEntry(date: .now, dolarValue: "1.234", count: 0)
  }

  func getSnapshot(in context: Context, completion: @escaping (DolarEntry) -> Void) {
    completion(currentEntry())
  }

  func getTimeline(in context: Context, completion: @escaping (Timeline<DolarEntry>) -> Void) {
    // .never: the widget doesn't fetch by itself, the app asks for a reload when the price changes
    completion(Timeline(entries: [currentEntry()], policy: .never))
  }

  private func currentEntry() -> DolarEntry {
    DolarEntry(date: .now, dolarValue: WidgetStorage.dolarValue, count: WidgetStorage.checkCount)
  }
}

extension Color {
  init(hex: UInt) {
    self.init(
      red: Double((hex >> 16) & 0xFF) / 255,
      green: Double((hex >> 8) & 0xFF) / 255,
      blue: Double(hex & 0xFF) / 255
    )
  }
}

// Like dollar_view.xml: same colors as android/app/src/main/res/values/colors.xml
struct DolarWidgetView: View {
  let entry: DolarEntry

  var body: some View {
    VStack(alignment: .leading, spacing: 4) {
      // Label
      HStack(spacing: 6) {
        Circle().fill(Color(hex: 0x66CC00)).frame(width: 8, height: 8)
        Text("DOLAR TODAY")
          .font(.system(size: 11, weight: .bold))
          .kerning(0.9)
          .foregroundStyle(Color(hex: 0x595956))
      }

      // Rate
      Text(entry.dolarValue ?? "—")
        .font(.system(size: 34, weight: .medium))
        .foregroundStyle(Color(hex: 0x222220))
        .lineLimit(1)
        .minimumScaleFactor(0.5)

      if entry.dolarValue == nil {
        Text("Cargando…")
          .font(.system(size: 12))
          .foregroundStyle(Color(hex: 0x595956))
      }

      Spacer(minLength: 0)

      // Counter
      HStack {
        Text("Chequeados: \(entry.count) veces")
          .font(.system(size: 12, weight: .medium))
          .foregroundStyle(Color(hex: 0x222220))
          .lineLimit(1)
          .minimumScaleFactor(0.7)
        Spacer(minLength: 4)
        Button(intent: IncrementCountIntent()) {
          Image(systemName: "plus")
            .font(.system(size: 18, weight: .semibold))
            .foregroundStyle(.white)
            .frame(width: 36, height: 36)
            .background(Circle().fill(Color(hex: 0x007F4A)))
        }
        .buttonStyle(.plain)
      }
      .padding(.leading, 12)
      .padding(.trailing, 6)
      .padding(.vertical, 6)
      .background(RoundedRectangle(cornerRadius: 16).fill(Color(hex: 0xF2F3ED)))
    }
    .containerBackground(Color(hex: 0xFCFDFB), for: .widget)
  }
}

// Like dolar_widget_info.xml: name, description and sizes
struct DolarWidget: Widget {
  let kind = "DolarWidget"

  var body: some WidgetConfiguration {
    StaticConfiguration(kind: kind, provider: DolarProvider()) { entry in
      DolarWidgetView(entry: entry)
    }
    .configurationDisplayName("Dolar Today")
    .description("Dolar Widget")
    .supportedFamilies([.systemSmall, .systemMedium])
  }
}
Next, open DolarWidget/DolarWidgetBundle.swift and make sure the body contains only DolarWidget(). Delete any DolarWidgetLiveActivity() or DolarWidgetControl() lines:
import WidgetKit
import SwiftUI

@main
struct DolarWidgetBundle: WidgetBundle {
    var body: some Widget {
        DolarWidget()
    }
}
Step 5: The “+” Button (DolarWidget/IncrementCountIntent.swift)
On iOS 17+, a widget button runs an AppIntent. This one adds 1 to the counter in the shared storage, and iOS redraws the widget automatically when it finishes. It replaces ACTION_INCREMENT, the PendingIntent and onReceive() from Android.
- Folder:
DolarWidget - Targets: ✅ DolarWidgetExtension only
import AppIntents

// Like ACTION_INCREMENT + onReceive() on Android.
// iOS re-renders the widget automatically after perform() finishes.
struct IncrementCountIntent: AppIntent {
  static let title: LocalizedStringResource = "Count one check"

  func perform() async throws -> some IntentResult {
    WidgetStorage.checkCount += 1
    return .result()
  }
}
Step 6: The Bridge to React Native (Native Module)
Now we expose dataToShow and getCheckCount to JavaScript. We create two files in the mywidgetapp folder.
- Targets: ✅ mywidgetapp only. These files use React, which is only available in the main app. If you also tick DolarWidgetExtension, the build fails with
cannot find type 'RCTPromiseResolveBlock' in scope.
DolarCheckWidget.swift (like DolarCheckWidgetModule.kt)
import Foundation
import WidgetKit

@objc(DolarCheckWidget)
class DolarCheckWidget: NSObject {

  @objc static func requiresMainQueueSetup() -> Bool { false }

  // Save the price and ask iOS to redraw the widget
  @objc func dataToShow(_ dolarInfo: String) {
    WidgetStorage.dolarValue = dolarInfo
    WidgetCenter.shared.reloadAllTimelines()
  }

  // Return to JS how many times "+" was tapped in the widget
  @objc func getCheckCount(_ resolve: RCTPromiseResolveBlock, rejecter reject: RCTPromiseRejectBlock) {
    resolve(WidgetStorage.checkCount)
  }
}
DolarCheckWidget.m (like DolarCheckWidgetPackage.kt + MainApplication.kt)
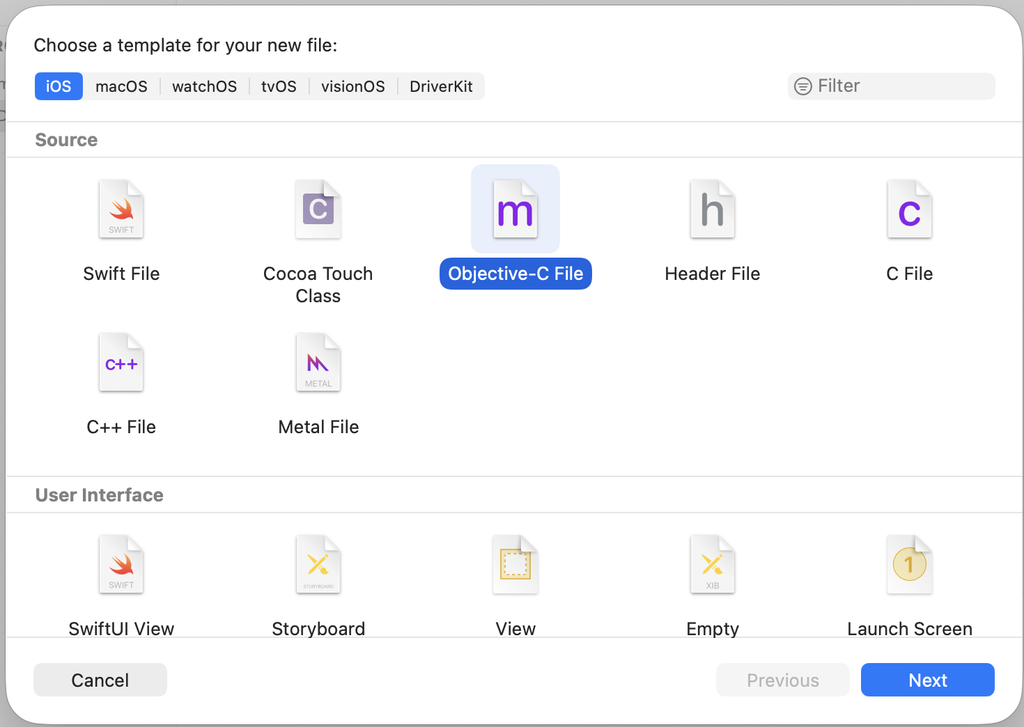
This file registers the Swift class with React Native under the name DolarCheckWidget. Use the Objective-C File template.
#import <React/RCTBridgeModule.h>

@interface RCT_EXTERN_MODULE(DolarCheckWidget, NSObject)

RCT_EXTERN_METHOD(dataToShow:(NSString *)dolarInfo)
RCT_EXTERN_METHOD(getCheckCount:(RCTPromiseResolveBlock)resolve
                  rejecter:(RCTPromiseRejectBlock)reject)

@end
Bridging header
Open mywidgetapp/mywidgetapp-Bridging-Header.h (Expo already created it) and add this line at the end, so Swift can see the React types (RCTPromiseResolveBlock, RCTPromiseRejectBlock):
#import <React/RCTBridgeModule.h>
Step 7: JavaScript
No changes are needed. App.tsx from Part 1 already calls NativeModules.DolarCheckWidget.dataToShow() and getCheckCount(), and the iOS module uses the same name and methods as the Android one.
Step 8: Run and Test
- Run the app with
npm run ios(or select the mywidgetapp scheme in Xcode, choose an iOS 17+ simulator, and press ▶). - Open the app so it fetches the rates and sends the price to the widget.
- Go to the home screen, long-press, tap Edit → Add Widget and add Dolar Today.
- Tap + on the widget a few times.
- Go back to the app and press Get counter from Widget. The counter should match.
If you change the widget code and don’t see the change, remove the widget from the home screen and add it again. iOS can keep the old version around.
Troubleshooting (iOS)
pod install fails with “Unable to find compatibility version string for object version 70“ Xcode 16+ saves the project in a newer format when you add a target, and CocoaPods can’t read it yet. Open ios/mywidgetapp.xcodeproj/project.pbxproj and change line 6 from objectVersion = 70; to objectVersion = 60;. Then run pod install again (from the ios folder) or npm run ios. Xcode may switch it back to 70 the next time you add a target.
cannot find type 'RCTPromiseResolveBlock' in scope DolarCheckWidget.swift or DolarCheckWidget.m is also part of the DolarWidgetExtension target. Select each file, open File Inspector → Target Membership and untick DolarWidgetExtension. Also check that the bridging header has #import <React/RCTBridgeModule.h>.
The widget doesn’t show the price, or the app always gets a counter of 0 The widget extension is missing the App Group. Select the DolarWidgetExtension target, open Signing & Capabilities and add App Groups with group.com.anonymous.mywidgetapp (see Step 2). This creates ios/DolarWidgetExtension.entitlements.
Build error “Cycle inside mywidgetapp” Select the mywidgetapp target, open Build Phases, and drag Embed Foundation Extensions above the [Expo] and [CP] script phases.
How It All Works Together
Communication Flow
- App → Widget: The React Native app fetches the exchange rate and sends it to the native module (
dataToShow). The module saves it and asks the system to redraw the widget. - Widget → App: When users tap the widget button, the counter increments in the shared storage, and the app can read it (
getCheckCount). - Data Persistence: Both values live in shared native storage,
SharedPreferenceson Android and the App Group’sUserDefaultson iOS.
| Android | iOS | |
|---|---|---|
| Shared storage | SharedPreferences | App Group UserDefaults |
| Redraw the widget | AppWidgetManager.updateAppWidget() | WidgetCenter.shared.reloadAllTimelines() |
| Widget button | PendingIntent broadcast | AppIntent |
Key Features
- Real-time Updates: Exchange rates update when the app is opened
- Widget Persistence: Counter data survives app restarts
- Two-way Communication: The widget can trigger app behavior and vice versa
- Native Performance: Each widget uses its platform’s native framework (Android App Widgets and iOS WidgetKit)
Next Steps & Enhancements
Consider these improvements:
- Auto-refresh: Implement scheduled background updates every 5 minutes
- Notifications: Alert users when exchange rates change significantly
- Multiple Currencies: Expand to show additional currency pairs
- Offline Support: Cache exchange rates for offline access
- Config plugin: Move the native widget code into an Expo config plugin, so
npx expo prebuildcan’t delete it
Conclusion
You’ve built a cross-platform widget app that combines React Native with native Android (Kotlin) and iOS (Swift + WidgetKit) code. This project shows how to bridge JavaScript and native code on both platforms with a single JavaScript API, so you can add native features like home screen widgets that users expect from mobile apps.